NeelSanghi.com Mini OS
 Hey everyone! Thanks for coming to my website. Check back often, as the development team continues to release the site it will be evolving rapidly. Feel free to call my cellphone (228) 234-NEEL. Peace.
-- Neel K. Sanghi  Need a website for your business or non-profit organization? I can set your website up for you from start to finish -- everything included. You simply email me the information about your organization. I, Neel K. Sanghi, will personally design, and host your site for $39.95/month. No setup costs, and you can cancel at anytime!
For $39.95/month you will receive the following. Just click on the "Subscribe" button below to get started.
Note: You must have or establish a PayPal account to enroll. No exceptions. |
Neel Sanghi's ProjectsI have several different projects going on. The following is a partial collection of some of my recent projects: Portable Building ProjectThe objective: To provide the largest possible, practical, portable, usable heatable/coolable space using the least amount of conventional building materials. 
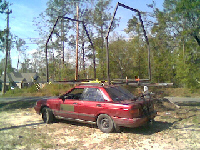
Partial building frame strapped to the top of a heavily abused 1991 Nissan Sentra using tiedown straps. (above picture) ready to make its 20+ mile journey to the new research and development test site in Hurricane Katrina ravaged Long Beach, Mississippi. This is a project that was started early 2006. This is a building I designed, welded, and tested out of steel. This project was conceived and funded by myself, Neel K. Sanghi. I imposed the following rigorous constraints on this builing that created a unique set of design challenges:
Smart Image Geocoding ProjectObjective(s):
Sanghi Smart Image Geocoding Technology (above) this image is the latest innovation from Sanghi GIS, a division of Sanghi Laboratories. It makes an attempt to predict where you are located and indicates this on the map using a red marker. This project was completed in 2005 for www.freecampingdirectory.com. This particular image is deemed 'smart' because it dynamically produces the image after conducting several real-time processes. It has long since been a problem for scientists/cartologists to accurately and proportionally present the topology of a spherical object on a flat surface without distortion. It is for this reason that this particular version of the Sanghi GIS Smart Image Geocoding technology is very accurate to about the ±49 Latitude. This is due to the distortion of the Mercator Projection Map. This technology can be applied and adapted to different map projections for specialized geocoding outside the non-distorted regions of a Mercator Projection Map. Feel free to embed the URL of this image in your webpages. I may be contacted for bulk geocoding services. Heater ProjectObjective: To heat the cab of a car without replacing OEM heatercore. 
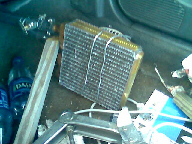
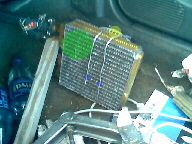
Heater core and miscallaneous parts used to make a heater core (above left) same image color coded for easy identification of components (above right); valve (red dot); heater core (green dot); aluminum grounding wire (blue dots); 12V fan (yellow dot) This project was done in December 2005. It was ridiculously cold in South Mississippi. I had previously plugged my heater core hoses on the 1991 Nissan Sentra due to a leak that appeared only after flushing the cooling system using solvent after changing the water pump just before Hurricane Katrina hit the Gulfcoast. Changing the OEM heatercore was a rather involved and time consuming job that required evacuating the R12 refridgerant from the air conditioning system and removing the entire dashboard. The Environmental Protection Agency requires that this refridgerant be collected into an EPA certified storage container. This requires and EPA certified air condition expert to do this, and would again require EPA certified personnel to restore the R12 unless I decided to convert the A/C from R12 to R134a refridgerant. Which if done properly requires many additional components to be changed. Needless to say this drives up the cost and time required for the repair. The cost of the OEM heatercore was around $170. This doesn't include labor, or miscallaneous or unforeseen expenses. Time to remove a heatercore from the same model car from a junkyard would be double the labor required. The $70 Solution: To reroute the cooling system hoses through the firewall and into a heatercore inside the cab, and to use a fan (yellow dot in above picture) to circulate air over the fins of the heater core (green dot in above picture) to transfer the heat into air of the cab. The valve (red dot in above picture) was $20+ and installed to restrict the flow of heated water into the core to regulate temperature inside the cab. The valve leaked at variable settings, and I didn't feel like replacing or modifying the valve because it would have required that I drain the coolant (antifreeze and water) which I didn't have to do for the initial installation. The heater core itself was around $36 new. It was for an American made vehicle but that didn't matter. Only the size of the fittings mattered to match the ID (inside diameter) of the original heater core hose. Other than the time sourcing the miscellaneous parts, the time required to drill two holes through my firewall and adapt some hose fittings was less than a couple of hours. The aluminum grounding wire was found in my warehouse in the DBS installation products, it is soft flexible non-corrisive wire used to ground satellite dishes, I used this to fasten the blower fan to the heater core. If you are going to build one of these you may have trouble finding grommets to protect the soft rubber hose from the sharp jagged metal edges of the firewall. A tear in the hose means the car would lose coolant and could potentially overheat leading to immobilization or worse a cracked or warped cylinder head or blown gasket. Instead of grommets I used 90° elbow connectors in the firewall and attach the rubber hoses to those. Pumpkin CarvingObjective: To carve a likeness of myself into a pumpkin for illumination.

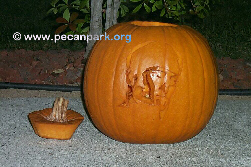
October 2005 Pumpkin carving done in the likeness of Neel K. Sanghi (above) Done in the essence of holiday pumpkin carving traditions in America. This project was done in October 2005. My sister invited me to carve pumpkins at her house with my nephews. The actual carving took about an hour and half. The pumpkin selection process took about 30 minutes. I carved directly into the pumpkin using proportions of particular likeness of myself that I had passively commited to memory from a previous experiment. This was the first pumpkin I carved in 16+ years. The material was vaguely familiar. After a few experimental cuts, I attempted to expand the palette from 2 color (light/dark) to 3 color (light/dark/reflected) by varying the cutting angle in perpendicular to the location of the flame source. A photograph for reference, some preparation and more intricate carving tools would have produced a more photo-realstic result.
|
BuddyList:
|
 |
|
| The Official Website for Neel Sanghi | www.neelsanghi.com |
| Saturday, December 20, 2025 | |
| Thank You for visiting neelsanghi.com. |